2.下载hexo backup 或者直接从旧电脑拷贝 为了省事,我建议删除node_modules文件夹,然后把剩余的文件全部备份。
git clone -b backup git@git.zhlh6.cn :****/*****.github.io.git
克隆backup–> 然后删除 .git文件夹-是否需要删除可以参考如下的图片-是否是备份仓库或者分支
1
2
3
4
5
6
7
8
9
10
11
12
13
14
15
16
17
18
19
20
克隆backup--> 然后删除 .git文件夹cmd 管理员中进行操作3 .0 .0 md 文件到_postcmd 非 管理员 中进行操作
1 2 3 4 5 6 7 8 9 10 11 12 13 14 15 16 17 18 19 20 21 22 23 命令调试1 .1 .2 ](https://www.npmjs.com/package/nib) 这个包里的 stylus 引起的问题,nib 里的 dependencies 如下:0 .54 .5 "4 years ago 了,估计是指望不上它更新了,那我们自己来解决吧!0 .54 .8 "
bat脚本启动git bash窗口,并执行命令- 一键清理生成发布备份+
bash在gitbash执行日志不乱码+
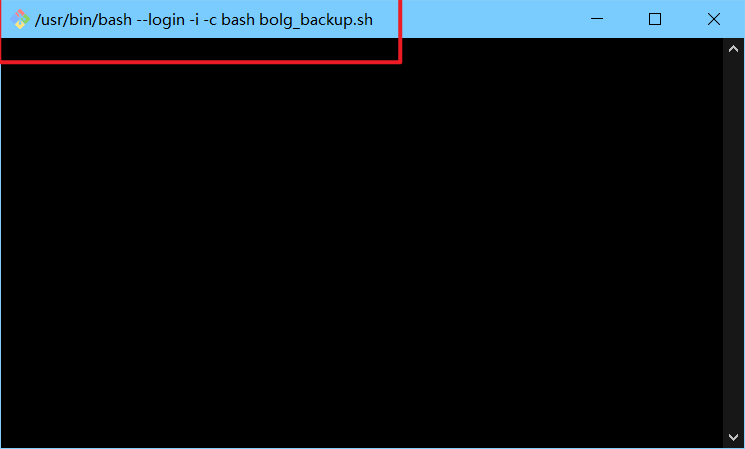
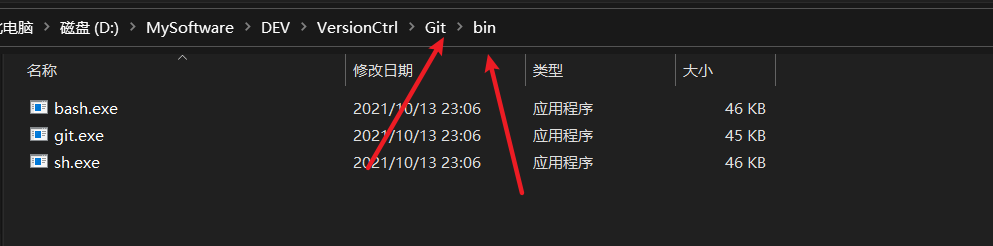
1 start "" "D:\MySoftware\DEV\VersionCtrl\Git\bin\sh.exe" --login -i -l -c 'bash bolg_backup.sh'
1 2 3 4 5 @echo OFFG: cd G :\MuyanGitBlog \MuyanGit \杂项\博客备份\start D :\MySoftware \DEV \VersionCtrl \Git \git -bash.exe -c "bash bolg_backup.sh "
1 2 3 4 5 6 7 8 9 10 11 #!/bin/bash1 >>G:\MuyanGitBlog\MuyanGit\杂项\博客备份\log.txt 2 >&1 cd G:/MuyanGitBlog/MuyanGit 3 >&1 4 >&2 2 >&4 1 >&3 ' 0 1 2 3 1 >>log.txt 2 >&1 echo 开始运行备份命令—————————————— && echo `date `······备份进行中 && hexo clean && hexo g && hexo d && hexo b && echo MuyanGit博客备份 && echo 结束运行备份命令—————————————— && echo `date `······备份结束中
插件解释:
1 2 3 4 5 6 install hexo-deployer-git --save install hexo-git-backup --saveinstall lineno --save
下载完以后,你就可以在新电脑上正常使用了。写一个新文章,试试
git check
hexo d
1 2 3 然后进入文件,打开gitbash或者cmd ,安装依赖(就是把你之前删除的node_modules文件装回来)cd backup
1
2
3
4
5
6
7
8
9
10
11
12
13
14
15
16
npm remove hexo-renderer-stylus & npm add hexo-renderer-stylus14 时的 Accessing non-existent property 'xxx' of module exports inside ···
2`解决 Hexo 在使用 Node.js 14 时的 Accessing non-existent property ‘xxx’ of module exports inside circular dependency 问题 _–> https://www.haoyizebo.com/posts/710984d0/ 今天把博客迁移到了新域名,顺便把 node.js 、Hexo 和主题都升了下级。
当习惯的运行 hexo s 命令时,发现多了些 warnings,如下:
1
2
3
4
5
6
7
8
9
$ hexo -s node :87224 ) Warning: Accessing non-existent property 'lineno' of module exports inside circular dependencynode --trace-warnings ...` to show where the warning was created)node :87224 ) Warning: Accessing non-existent property 'column' of module exports inside circular dependencynode :87224 ) Warning: Accessing non-existent property 'filename' of module exports inside circular dependencynode :87224 ) Warning: Accessing non-existent property 'lineno' of module exports inside circular dependencynode :87224 ) Warning: Accessing non-existent property 'column' of module exports inside circular dependencynode :87224 ) Warning: Accessing non-existent property 'filename' of module exports inside circular dependency
说实话我对 node.js 没啥了解,但是单词还是认识几个,看起来像是循环依赖的问题。(习惯性想起了一道面试题:Spring 是如何解决循环依赖的?)
这些 warnings 其实对 Hexo 程序运行没啥影响,只是看起来不舒服罢了。
但出于好奇和洁癖,就去 google 了一下。这里来总结一下原因及解决方案。
原因其实就是 #29935 这个 pr 被合到 node.js 14.0.0 里边了,所以从 node.js 14 开始,这个问题就在网上不断被讨论了。
大家的解决办法也是五花八门,其中一个比较有代表性的是把 node 降级,降到 12 就不会报这个 warning 了
1
2
3
4
brew uninstall node brew install node @12 node @12
但这样解决问题显然不是我的风格,继续翻 Github 上的 issues,发现具体到 Hexo 这里的 warning 是由于 stylus 导致的,幸运的是 3 天前 stylus 在 0.54.8 版本修复了这个问题(见 pr #2538 )。
所以对于 Hexo 用户来说,重新装一下 hexo-renderer-stylus 就可以愉快的 hexo s 了
1
2
3
npm remove hexo-renderer-stylusadd hexo-renderer-stylus
至于其他的 package 导致的 warnings,可以使用如下方式来看看具体是哪个 package 导致的
1
2
3
4
npx cross -env NODE_OPTIONS="--trace-warnings" hexo scross -env NODE_OPTIONS="--trace-warnings" hexo gcross -env NODE_OPTIONS="--trace-warnings" hexo clcross -env NODE_OPTIONS="--trace-warnings" hexo d
UPDATE,接昨天说的:
刚写完准备睡觉,发现 hexo s 不报 warning 了,但是启动后又报了 😶
使用上边刚说的那个命令,发现这其实是 nib@1.1.2 这个包里的 stylus 引起的问题,nib 里的 dependencies 如下:
1 2 3 4 {"stylus" : "0.54.5" Copy
已经有人给 nib 提 issue 了,但看它最后一次更新已经是 4 years ago 了,估计是指望不上它更新了,那我们自己来解决吧!
在 package.json 里增加 resolutions 来覆盖版本定义
1
2
3
4
"resolutions" : {"stylus" : "^0.54.8" Copy
然后重新 yarn install 一下就好了。
至此 hexo 就可以和 node.js 14 开始愉快的旅程了~
参考:
备份·1· hexo-deployer-git –save· fatal: ‘github’ does not appear to be a git repository
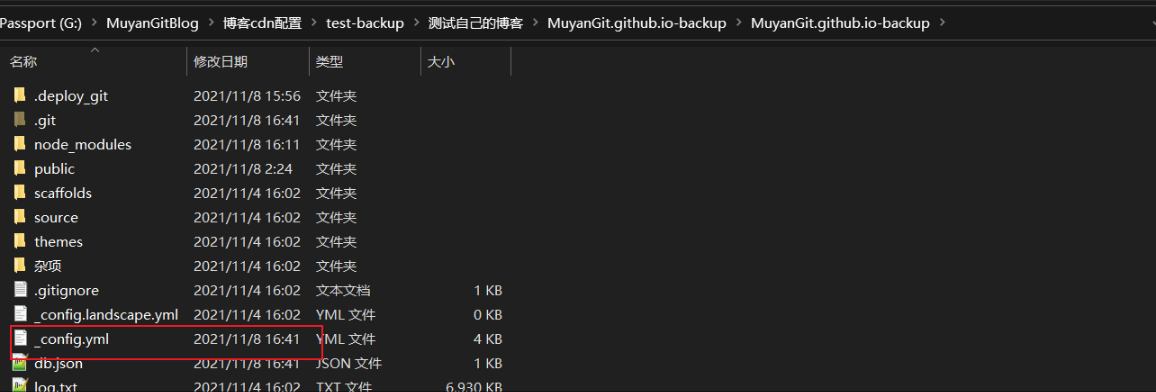
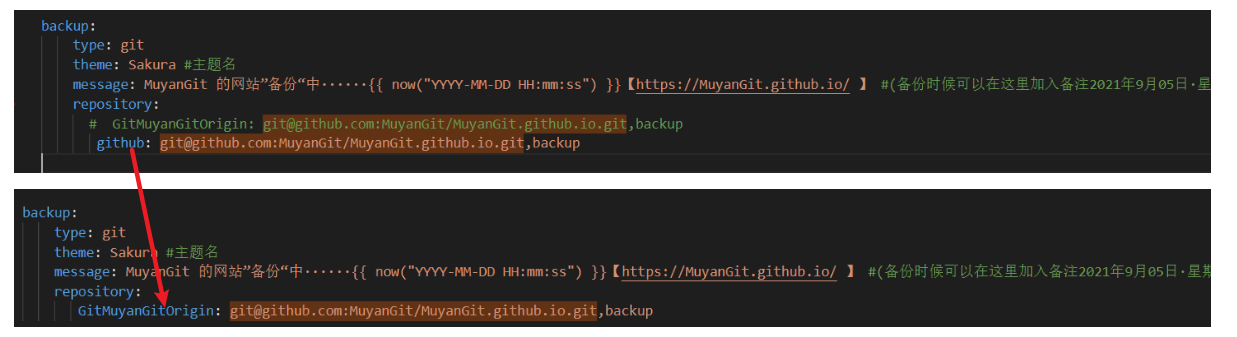
config.yml–> github修改为分支名****Origin
备份·3· 一、现象
二、原因分析 Permission denied (publickey) 没有权限的publickey ,出现这错误一般是以下两种原因
客户端与服务端未生成 ssh key 客户端与服务端的ssh key不匹配 三、解决办法 我们新生成一个ssh key就可以了
依次执行如下命令
1、打开git bash,
右击桌面空白处,选择【git bash】
2、进入ssh 路径下
cd ~/.ssh
3、生成新的ssh key
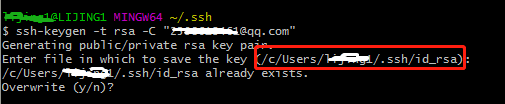
输入如下命令,youremail@example.com 改为自己的邮箱
ssh-keygen -t rsa -C “youremail@example.com “
然后回车,途中会让你选择生成的ssh key的存放目录和输入密码,不用管,直接回车。
这里有个坑,需要把原来生成的ssh key文件删除,否则不会生成新key的时候,会报文件已存在而导致无法生成新的key。一般ssh key的文件路径都是【C:\Users\username.ssh\id_rsa】,其中username是你这个用户的用户名。如果没找到,可以先执行如下命令,回车后,系统会告诉你路径。
4、执行命令
ssh -v git@github.com
最后会出现
git@github.com : Permission denied (publickey).
5、执行命令
ssh-agent -s
知识点:
ssh-agent的角色就是帮忙存储、查找并发送对应的指纹而已,也就是说它是一个连接的转发人,扮演的是一个代理的角色。
使用ssh-agent后,可以通过ssh-add命令向ssh-agent注册本机的私钥,ssh-agent会自动推导出这个私钥的指纹(实际上是ssh-add计算的)保存在自己的小本本里(内存),以后只要ssh连接某主机(某用户),将自动转发给ssh-agent,ssh-agent将自动从它的小本本里查找私钥的指纹并将其发送给服务端(sshd端)。如此一来,ssh客户端就无需再指定使用哪个私钥文件去连接。
6、将新生成的ssh key添加到ssh-agent
ssh-add ~/.ssh/id_rsa
坑:
如果这时出现【Could not open a connection to your authentication agent.】
则先执行下【eval ssh-agent -s】,再执行【ssh-add ~/.ssh/id_rsa】就可以了
7、创建ssh key
打开刚刚生成的id_rsa.pub文件,复制里面的内容
进入你的github账号:https://github.com/settings/keys
settings→SSH and GPG keys→new SSH key,
title随便取一个名字,然后将id_rsa.pub里的内容复制到Key中,完成后Add SSH Key。
坑:
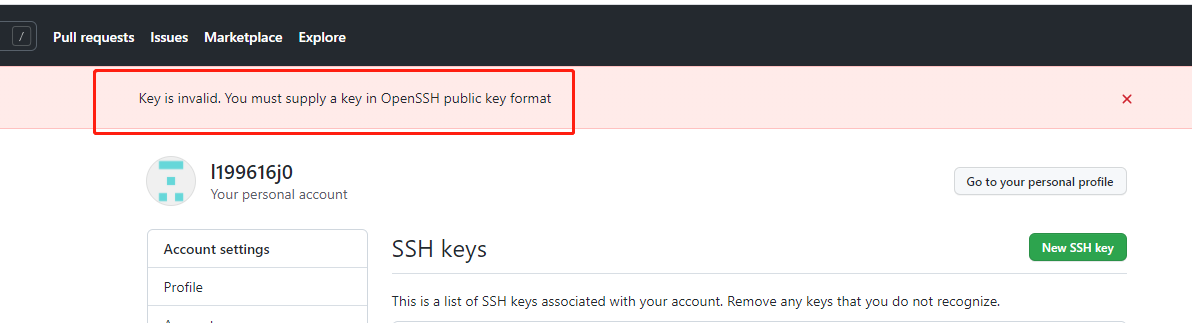
如果添加key失败,提示【Key is invalid. You must supply a key in OpenSSH public key format】格式错误。
则在bash下执行命令【cat id_rsa.pub】然后复制key,再去github上添加
8、验证
ssh git@github.com
成功了
9、再次执行git get,成功了
重要:第一次使用gitbash提交哦-方便输入私人口令来建立连接
备份4·
使用代理
1 在开启shadowsocks的前提下,手动配置git的代理。git客户端输入如下两个命令就可以了。git config --global http .proxy http ://127.0 .0 .1 :1080 git config --global https.proxy http ://127.0 .0 .1 :1080 http ://也可以改成sockets5://,但是区别在于:socks5不支持通过pubkey免密登录github,每次提交代码只能输入用户名和密码。http 可以支持免密登录。取消代理:git config --global --unset http .proxy git config --global --unset https.proxy 其实方案一和方案二是同一种方法,不过方案二更加具体一点罢了,大部分问题都可以用方案二解决,当方案二无效时,考虑使用方案一。
最近换电脑了。今晚有空正好把我的hexo搬过来了,在这里分享一下换电脑以后如何转移hexo。
我们要知道 ,在我们的hexo博客文件中有一个.gitignore,这个文件就是在你同步的时候不把某些文件上传到github上,所以我们直接从github下拉文件到新电脑是行不通的。
为了省事,我建议删除node_modules文件夹,然后把剩余的文件全部备份。
2.新电脑准备工作 2.1 准备好git git下载链接:https://git-scm.com/downloads
安装:一路右键安装
打开gitbash设置用户,注意这个不是登录,是给你的电脑设置一个用户,等你上传的时候,告诉远程仓库是谁上传的而已。
1 git config --global user.name "你的名字"(注意前边是“- -global”,有两个横线)git config --global user.email "你的邮箱"执行:ssh-keygen -t rsa -C "yourmail@163 .com" 敲四下,使用默认的名称 rsa_id或者ssh-keygen -t rsa -f C:/Users/asus/.ssh/随便名字_id_rsa -C "yourmail@xxx.com" 敲三下,使用自定义名称。将生成好的 .pub 文件内容添加到码云的个人设 =》SSH公钥打开 `cmd ` ,输入命令,查看git版本:git --version### 二、查看是否配置了git用户名和邮箱1 . 查看用户名git config user.name1. 查看用户邮箱git config user.email如果没有配置,那么需要配置用户名和邮箱:1 . 配置用户名:git config --global user.name "xxx"1 . 配置用户邮箱git config --global user.email "xxx"#### 2 、查看 ssh文件是否配置成功ssh -T git@github.com输出: Hi danygitgit! You've successfully authenticated, but GitHub does not provide shell access.``` 恭喜你,你的设置已经成功了。### 六、修改git的remote url 如果之前添加的是 `HTTPS` 协议的github仓库地址,那么每次push或者pull仍然需要密码,所以,我们需要将其修改为 `ssh` 协议的,这样,就不需要这么麻烦了。#### 1 、查看当前的 remote url 首先进入本地仓库,右键 -> `Git Bash Here` git remote -v复制代码输出: origin https://github.com/danygitgit/document-library.git (fetch)输出: origin https://github.com/danygitgit/document-library.git (push) 如果是以上的结果那么说明此项目是使用 `https` 协议进行访问的(如果地址是git开头则表示是 `git` 协议)#### 2 、复制远程仓库的ssh链接#### 3 、修改git的remote url方法有三种:1 . 修改命令git remote origin set -url [url]1 . 先删后加git remote rm origingit remote add origin [url]1 . 直接修改`config`文件 找到仓库下 `.git` 文件夹下的 `config` 文件,打开,可以看到以下内容 将文件中的 `url =https://github.com/danygitgit/document-library.git `更改为 `url = git@github.com:danygitgit/document-library.git` 即可。 修改后的文件如下 以后,不管是push还是pull,你都不需要再提交密码了。### 七、Sourcetree配置ssh密钥 `SourceTree` 是一款git管理可视化工具,就不需要繁琐的敲打命令行了。个人比较推荐,无论在windows环境还是mac的os环境。[官网链接](https://link.juejin.cn/?target=https%3A% 2 F%2Fwww.sourcetreeapp.com% 2 F)
ssh-add命令是把专用密钥添加到ssh-agent的高速缓存中
命令 作用 -D 删除ssh-agent中的所有密钥. -d 从ssh-agent中的删除密钥 -e pkcs11 删除PKCS#11共享库pkcs1提供的钥匙 -s pkcs11 添加PKCS#11共享库pkcs1提供的钥匙 -L 显示ssh-agent中的公钥 -l 显示ssh-agent中的密钥 -t life 对加载的密钥设置超时时间,超时ssh-agent将自动卸载密钥 -X:对ssh-agent进行解锁 -x 对ssh-agent进行加锁
1.把秘钥添加到ssh-agent中
1 ssh-add C :/Users/ cc_want/.ssh /test_rsa
2.从ssh-agent中删除
1 ssh-add -d C :/Users/ cc_want/.ssh /test_rsa
3.查看ssh-agent中的所有秘钥
SSH-ADD / Windows / Could not open a connection to your authentication agent. #17 1 If you have this issue :In the CMD window, type the following command:cd path-to-Git /bin (for me : cd C :\Program Files \Git \bin)bashexec ssh-agent bashssh-add MYKEY
配置好SSH,GitHub教程 SSH keys配置
记得把git添加到环境变量中,要不然后边使用hexo时候会报错’git’ 不是内部或外部命令,也不是可运行的程序 或批处理文件。
补充 :添加环境变量
直接搜索环境变量打开 添加环境变量:双击打开系统变量的path 找到你git的安装目录,把bin的地址加入到path中即可。 2.2 准备好Node.js Node.js安装配置
给你的npm换成淘宝源,这样待会下东西下的更快。https://registry.npm.taobao.org/ npm超详细入门 源管理 | 常用指令 | 下载 | 淘宝源卸载 )
2.3准备好hexo 既然你已经回忆起npm怎么用了,那你用npm安装上hexo
3.将备份文件转移到新电脑 就是直接把你那个文件复制到新电脑上。
1 然后进入文件,打开gitbash或者cmd ,安装依赖(就是把你之前删除的node_modules文件装回来)cd backup npm install
1 npm install hexo-deployer-git --save下载完以后,你就可以在新电脑上正常使用了。写一个新文章,试试hexo cleanhexo d打开博客,你的文章就更新啦。