Windows Terminal 完美配置 PowerShell 7.1 - 知乎
首发于修辞与编程
Windows Terminal 完美配置 PowerShell 7.1

700 人赞同了该文章
坑边闲话:忆往昔岁月,不堪回首,伟大的 Windows 竟然拿不出一个像样的终端模拟器。mintty.exe 和 封装后的 cmder 之流,总是有各种问题,而且不兼容 emoji 字符。后来,全网 Windows 用户随着一个华丽的广告沸腾了,微软宣布了终端软件 Windows Terminal 的开发进程,而且开源!如今,Windows Terminal 正式版已经陪伴我们走过了很长一段时间,其稳定性和易用性已经非常不错,关键是颜值相当高。如果你是一个追求完美与和谐的 User,那么请跟上我的步伐,我们重新起航!
重要提醒:本文的所有配置经过无数网友的多重考验,请勿在配置过程中突发奇想而走弯路,一定要认真阅读每一个段落、每一个句子!
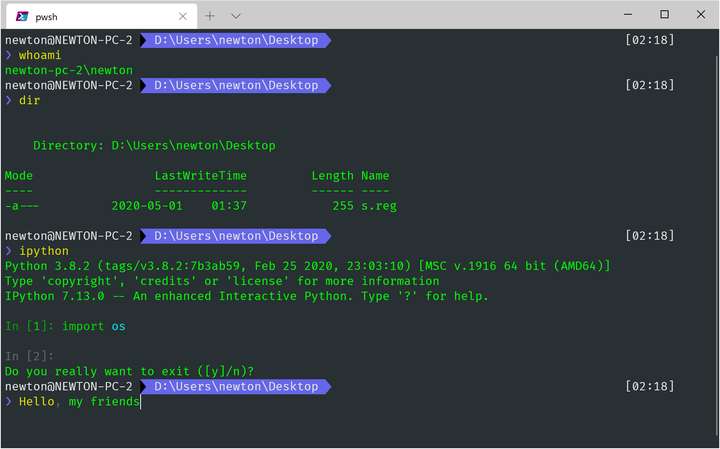 图 1:常规展示

图 2:在 git 目录下的效果。

1. 安装 Windows Terminal
相信这一步对大多数人不构成任何困难,去 Microsoft Store 搜索下载就是了。
1 | |
配置
1 | |
修改后的配置文件:

1 | |
该项难度系数:0
2. 安装字体
这里仅推荐一款字体:Fira Code Nerd Font。该字体支持 ligature 连字功能,而且是一款专门为代码显示准备的字体,该字体也支持很多有趣的特殊字符,非常适合在终端里使用。该字体开源,广受海内外程序员好评!
装上该字体,即可进入下一步。
需要的字体如图:

1 | |

1 | |
该项难度系数:1
(或许有人登 Github 有网络问题,请自行解决。)
3. 1安装新款 Powershell Core
首先声明,我们这儿用的 Powershell 与 Windows 自带的 Powershell 是完全不同的两个东西,除了功能相似和名字相同,两者内在已经天差地别。
现阶段 Windows 10 自带的 Powershell 错误提示冗长,颜值低,速度慢,总之就是不太值得去用了。
那么 Powershell Core 是什么呢?这是伟大的 .Net Core 跨平台战略的一个重要组成部分,微软设想,要让强大的 .Net 在所有平台上通用,让这么强大的 Powershell 在所有平台上都能用,古老的 bash 可以退休了!
基于以上愿景,微软开始了漫长而辉煌的征程。
在 https://github.com/PowerShell/PowerShell/releases 这个GitHub 链接里,有目前 Powershell 的最新版,我建议你从 release 里选个最新的 preview 版本。经过测试,这些预览版都相当稳定。
直接单击此处下载 x86-64 Windows 64 位 .msi 安装包。
该项难度系数:1
难度同样来自于访问 Github。
3.2. 添加 Powershell 启动参数
在 powershell 中输入
1 | |
紧接着在弹出的页面中输入下面这一长串代码,保存并关闭。这个 Profile 配置文件与 .zshrc / .bashrc 文件一样,都是控制启动前参数的。
1 | |

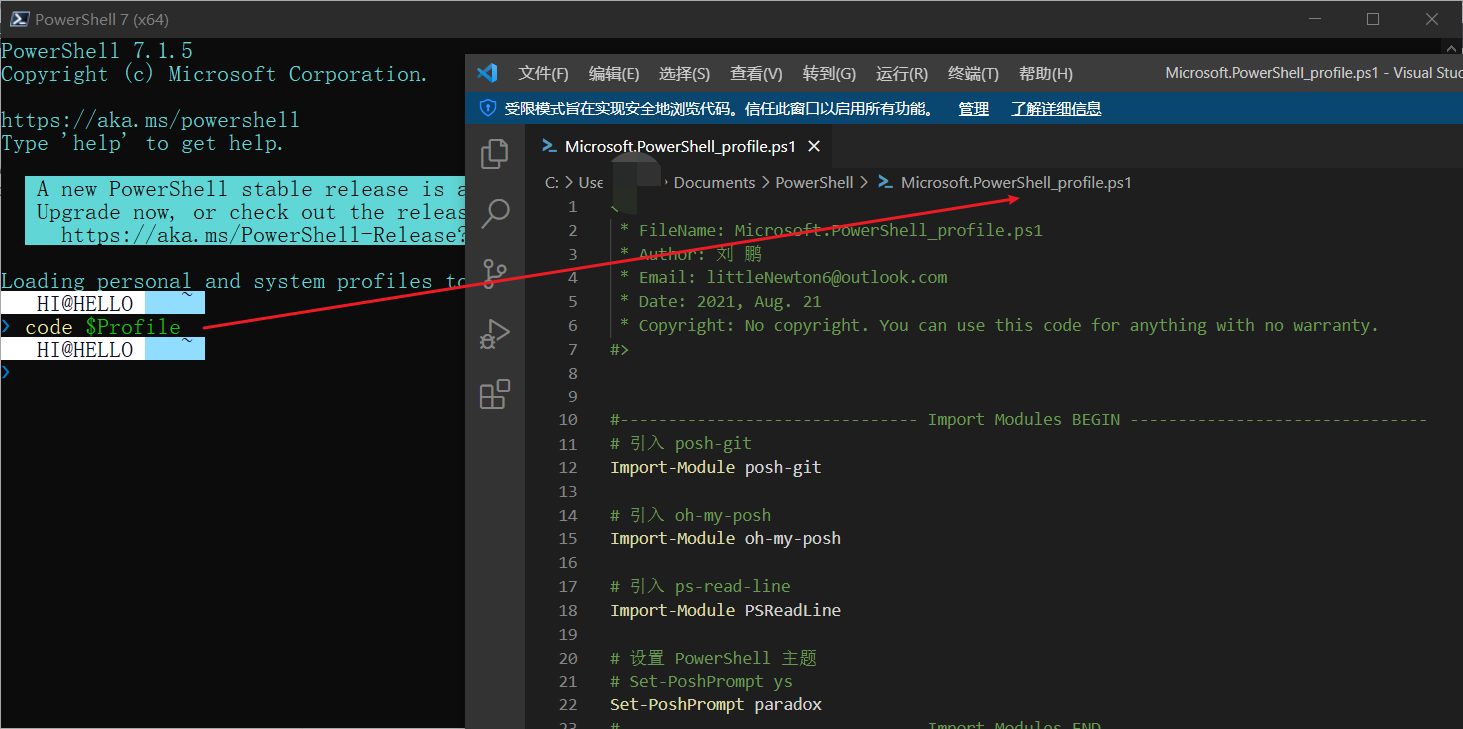
注意路径需要修改一下
1 | |
另外,如果你喜欢我的主题,可以用 Everything.exe 搜索 paradox.omp.json 这个文件,把它替换为这个链接里的文件。
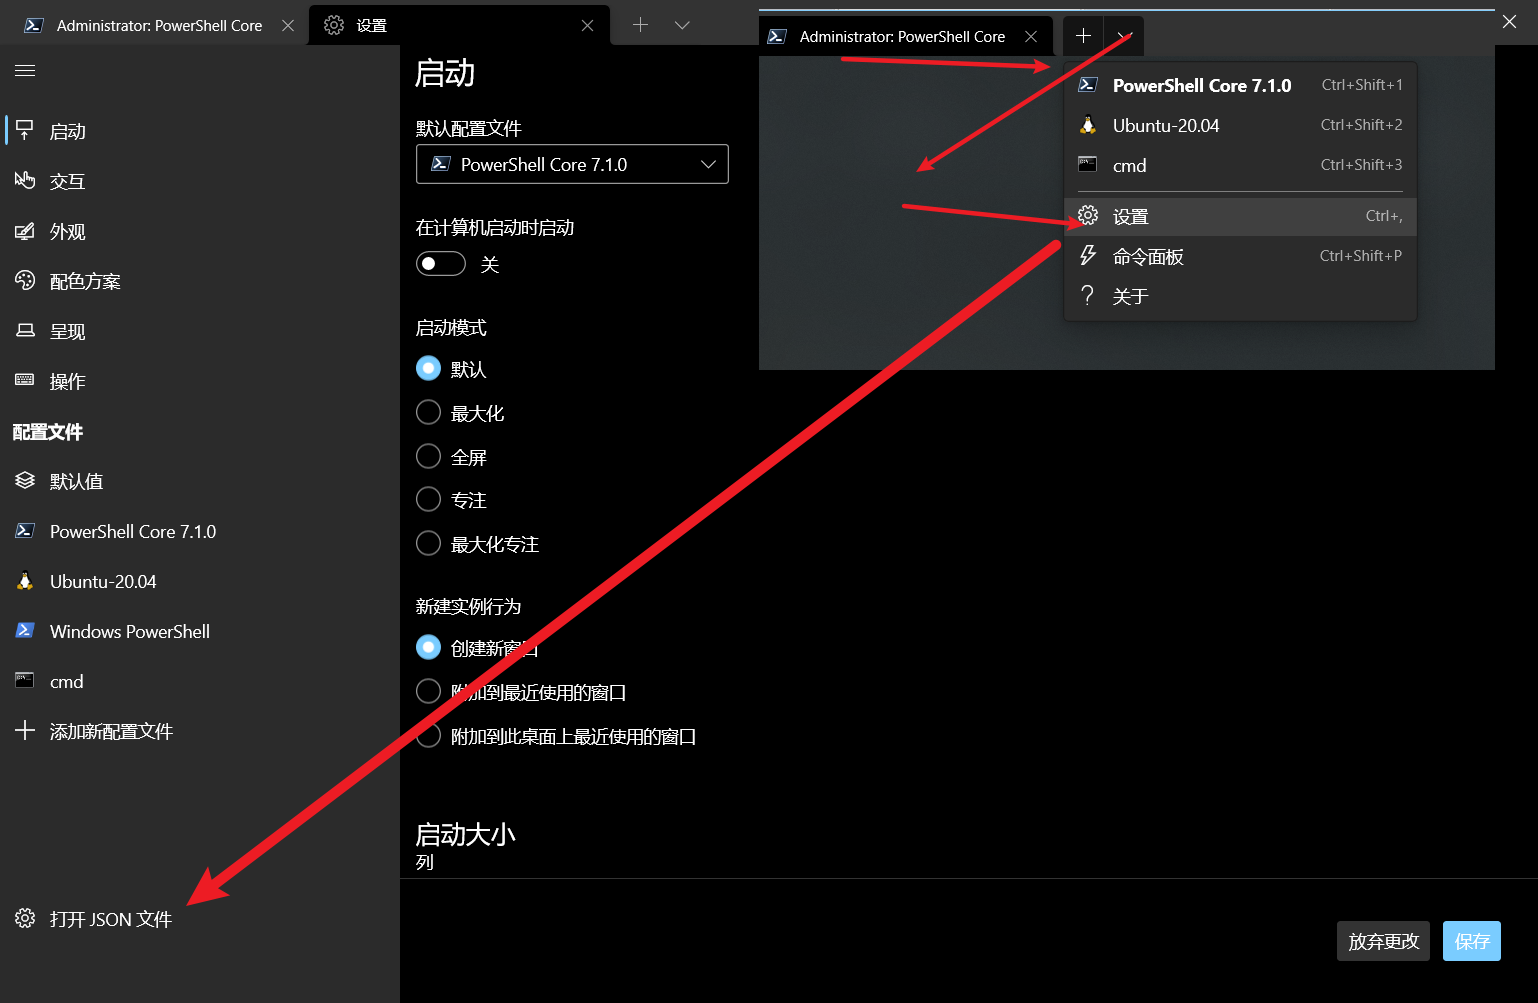
4. 安装 Powershell 插件
这一步是灵魂。
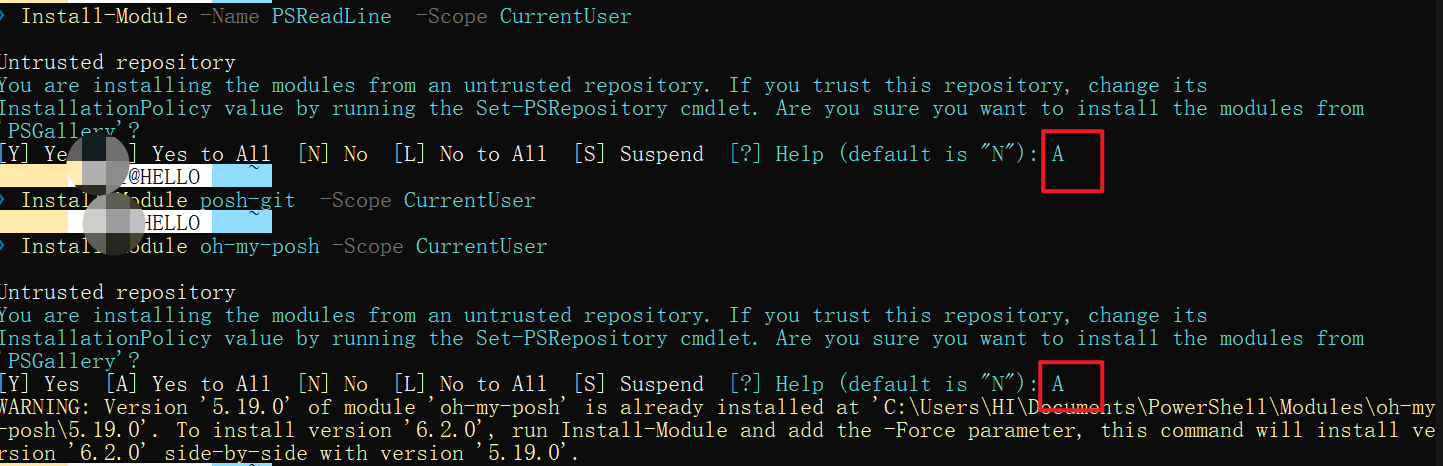
直接上代码:管理员打开刚装好的新版 powershell,逐行输入命令。
1 | |
安装过程可能有点慢,好像卡住了一样,但是请耐心等待几分钟。等不及的同学自行搜索科学方法访问 GitHub.
win键盘 –> pwsh–> 如图

安装时系统会提问是否继续,不用管它直接输入 A 并回车即可。
该项难度系数:0
5. 配置 Windows Terminal
这一项是灵魂。
只有新款 Powershell 而没有 Windows Terminal,好比吃肉不放盐。
简单点,直接上配置代码,遇到不懂的地方,自己读注释。记得将此设置默认配置(代码已经给出)。
1 | |
同时附上 Homebrew 配色,该配色经过我改良。
1 | |
特别注意,用其他配色可能降低颜值。
Note: 由于 Windows Terminal 的配置非常复杂,整个文件很长,可直接参考这个链接。
该项难度系数:0
需要懂点 json,还需要会配置 Windows Terminal。
1 | |
6. 添加右键菜单
这一步是灵魂中的灵魂。
这里涉及修改注册表,小白请勿手残改坏注册表,强烈建议事前建立系统还原点!
Github 上面已经有 powershell 脚本了,可以用管理员身份运行该脚本 + 某些参数以实现配置右键菜单。
我修改后的脚本仓库 (建议用这个)
建议下载我这个,然后在管理员模式的 powershell 7 里运行:
1 | |
记住一定要以管理员身份在 powershell 7 里面运行该脚本。
图 3: 用我修改后的脚本安装之后的效果如图
目前发现问题:该脚本会读取 Windows Terminal 的 profile,然后把其中的非隐藏项目添加到右键菜单(默认视图),这之后如果你修改了 profile,那么需要用 uninstall.ps1 脚本先清除右键菜单,然后重新 install 一遍。
后续字体需要修改哦
字体修改如下

PowerShell、CMD 和 Windows Terminal 的美化配置方法
[
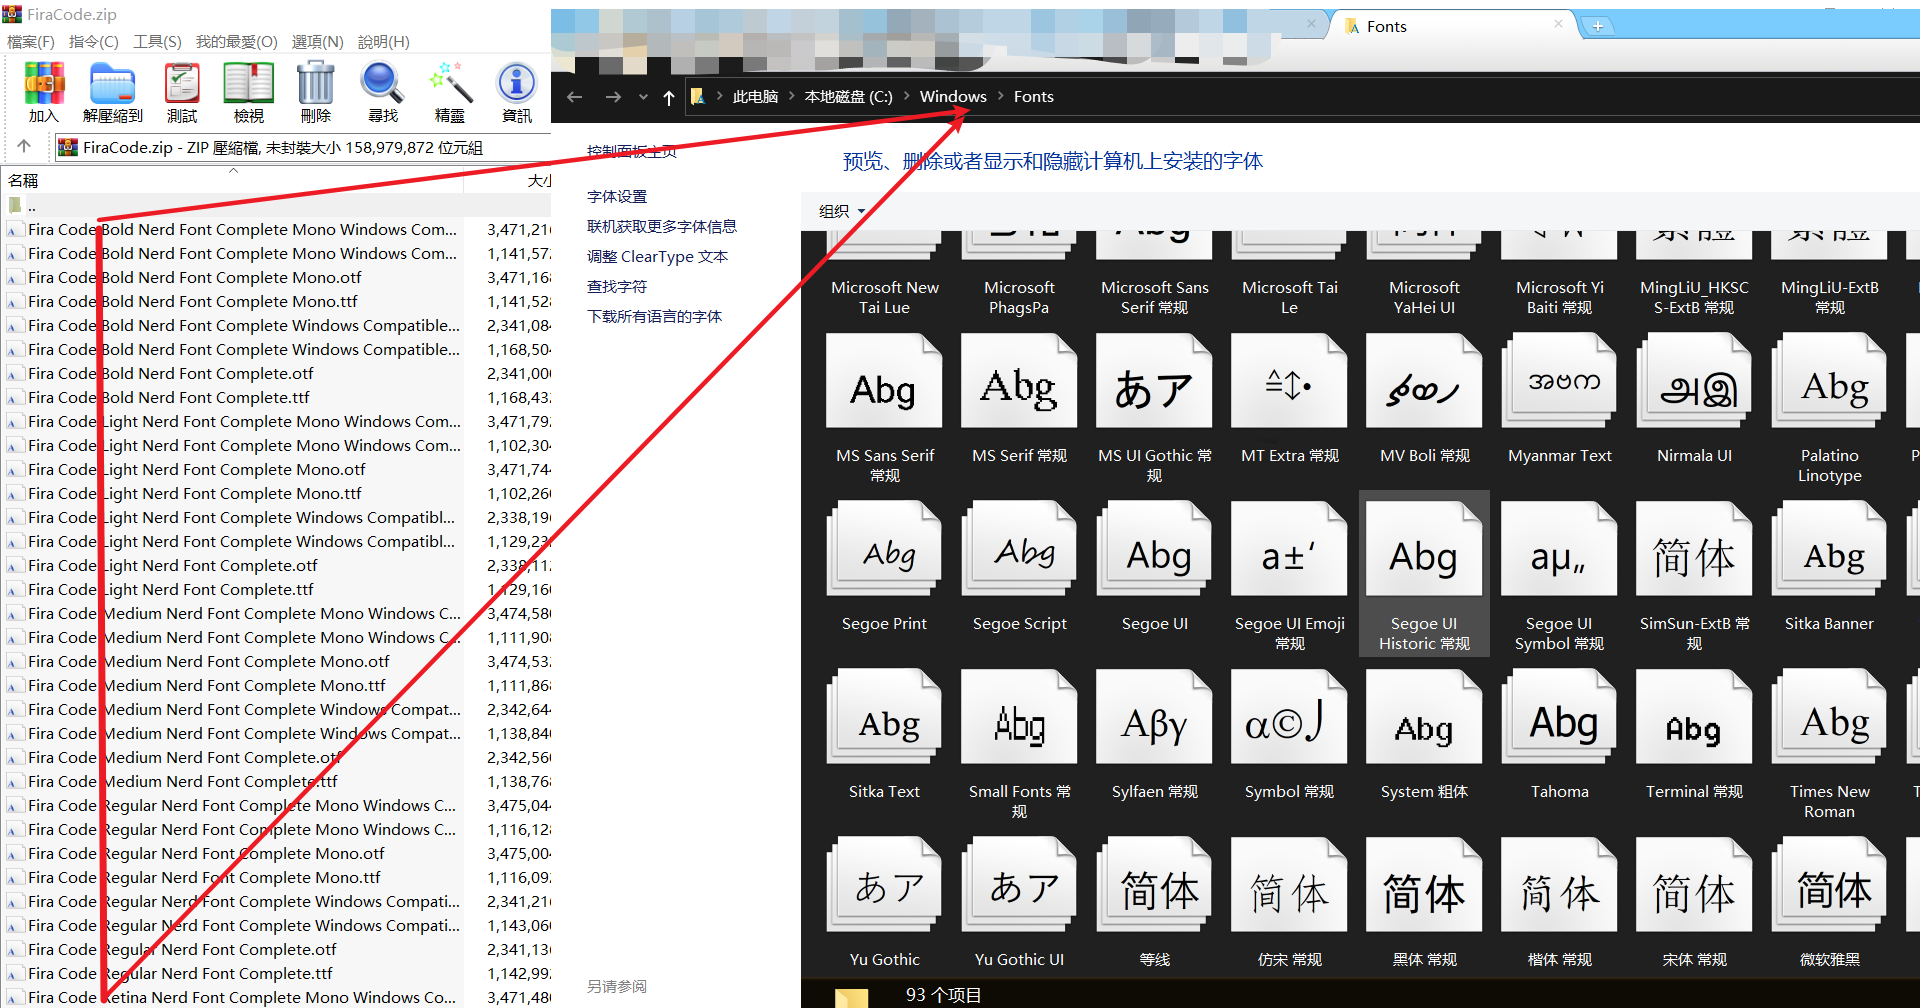
1. 安装字体
(附件中有所需要的字体文件)
推荐使用 FiraCode NF 和更纱黑体。
FiraCode NF 下载地址:
Github - FiraCode NFgithub.com/ryanoasis/nerd-fonts/releases
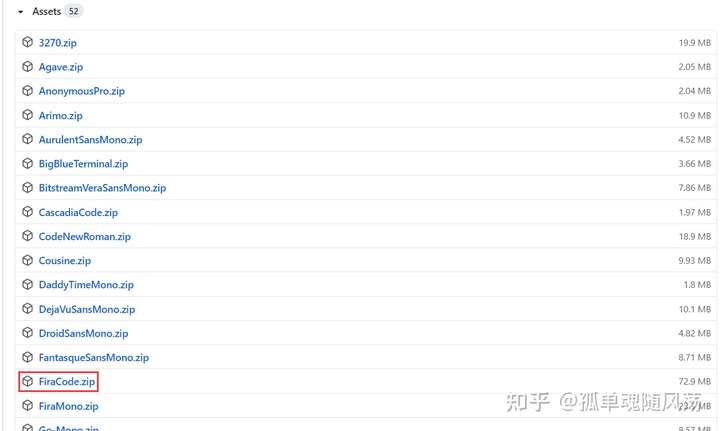 下载 FiraCode NF Retina 字体
将.zip 文件下载到本地,然后打开该压缩文件,将“Fira Code Regular Nerd Font Complete Mono Windows Compatible.otf”文件解压到本地并重命名为“FiraCode NF.OTF”,右击后选择“为所有用户安装”。
更纱黑体下载地址:
Github - 更纱黑体github.com/be5invis/Sarasa-Gothic/releases
 下载更纱黑体
将 .7z 文件下载到本地,然后打开该压缩文件,将“sarasa-mono-sc-regular.ttf”文件解压到本地并重命名为“Sarasa Mono SC.TTF”,右击后选择“为所有用户安装”。
2. 设置默认字体
设置默认字体是设置的 PowerShell 和 CMD 的默认字体。
2.1 设置 CMD 的默认字体
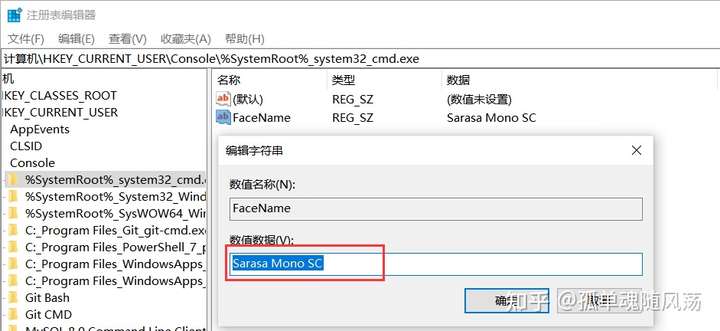
(附件中有注册表.reg 文件,可以直接导入)
按快捷键 Win+R 打开“运行”窗口,输入“regedit”后回车打开“注册表编辑器”,然后进入目录[HKEY_CURRENT_USER\Console%SystemRoot%_system32_cmd.exe],在右侧空白处鼠标右击–>新建–>字符串值,并重命名为“FaceName”,双击打开后输入“Sarasa Mono SC”并“确定”。
 设置 CMD 的默认字体
2.2 设置 PowerShell 的默认字体(System32)
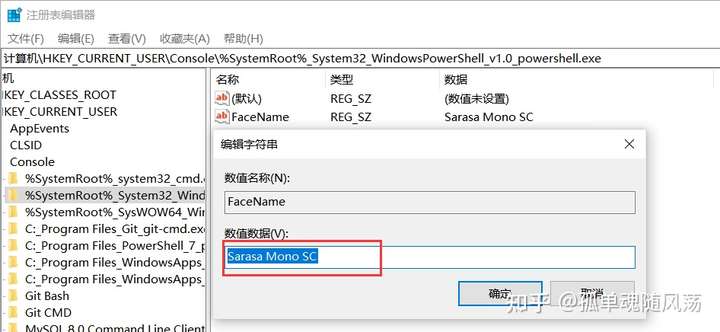
进入目录[HKEY_CURRENT_USER\Console%SystemRoot%_System32_WindowsPowerShell_v1.0_powershell.exe],在右侧空白处鼠标右击–>新建–>字符串值,并重命名为“FaceName”,双击打开后输入“Sarasa Mono SC”并“确定”。
 设置 PowerShell 的默认字体
2.3 设置 PowerShell 的默认字体(SysWOW64)
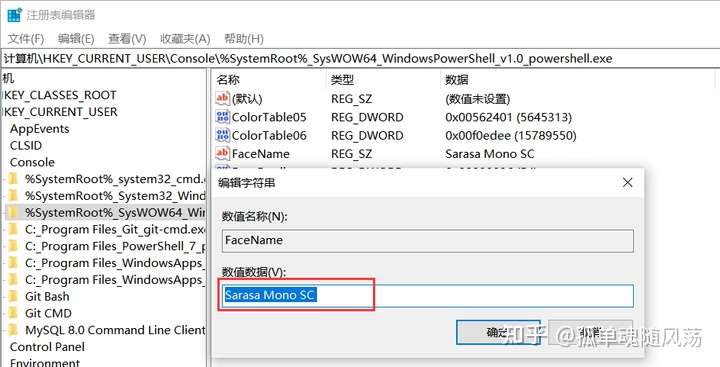
进入目录[HKEY_CURRENT_USER\Console%SystemRoot%_SysWOW64_WindowsPowerShell_v1.0_powershell.exe],在右侧空白处鼠标右击–>新建–>字符串值,并重命名为“FaceName”,双击打开后输入“Sarasa Mono SC”并“确定”。
 设置 PowerShell 的默认字体
3. 注册字体
注册字体的作用当 PowerShell 设置 Sarasa Mono SC 字体后支持显示 Emoji。
进入目录[HKEY_LOCAL_MACHINE\SOFTWARE\Microsoft\Windows NT\CurrentVersion\FontLink\SystemLink],在右侧空白处鼠标右击–>新建–>字符串值,并重命名为“Sarasa Mono SC”,双击打开后输入如下值(最后一行需要留一个空段落):
BSSYM7.ttf,Bookshelf Symbol 7
HOLOMDL2.ttf,HoloLens MDL2 Assets
MARLETT.ttf,Marlett
REFSPCL.ttf,MS Reference Specialty
MTEXTRA.ttf,MT Extra
SEGMDL2.ttf,Segoe MDL2 Assets
SEGUIEMJ.ttf,Segoe UI Emoji
SEGUIHIS.ttf,Segoe UI Historic
SEGUISYM.ttf,Segoe UI Symbol
SYMBOL.ttf,Symbol
WEBDINGS.ttf,Webdings
WINGDING.ttf,Wingdings
WINGDNG2.ttf,Wingdings 2
WINGDNG3.ttf,Wingdings 3
[请删掉此行文字保留空段落]
并“确定”。
注册字体
重启电脑。
4. 设置 PowerShell
按快捷键 Win+R 打开“运行”窗口,输入“PowerShell”后回车打开“Windows PowerShell”,在标题栏右击,选择“属性”。
4.1 字体
切换到“字体”,找到“等距更纱黑体 SC”并选中,然后“大小”设置成“20”。
设置 PowerShell 字体
4.2 颜色
(附件中有完整的设置截图,可以对照截图来挨个设置各个颜色块的颜色值)
切换到“颜色”。
4.2.1 屏幕文字
选中“屏幕文字”,然后点击下方选中的颜色块,再在“选定的颜色值”的“红(R) 蓝(H) 绿(L)”中依次输入“147,161,161”,“不透明度”选择“90”。
设置 PowerShell 颜色-屏幕文字
4.2.2 屏幕背景
选中“屏幕背景”,然后点击下方选中的颜色块,再在“选定的颜色值”的“红(R) 蓝(H) 绿(L)”中依次输入“253,246,227”。
设置 PowerShell 颜色-屏幕背景
注:为了能在后面的操作中看清 PowerShell 命令,请单独设置一下这个颜色块的颜色值,设置后“屏幕背景”仍然选择第一个颜色块。
单独设置此颜色块
4.3 终端
切换到“终端”,“光标形状”选中“竖条”。
设置 PowerShell 终端
点击“确定”,然后关闭 PowerShell 再重新打开,设置生效。
PowerShell 设置生效
5. 设置 CMD
方法跟上方大致相同,不再赘述。
CMD 设置生效
6. 安装 Windows Terminal
看到这里您可能会感觉到,怎么美化了 PowerShell 还是达不到心理的预期值(还是丑),这里向大家推荐使用微软官方出品的 Windows 终端工具——Windows Terminal。
下载地址:Windows Terminal(会调用本地的 Windows 10 应用商店进行安装)
喜欢尝鲜可以安装预览版(已支持图形化设置界面),下载地址:
6.1 配置 Windows Terminal
6.1.1 安装 Git
(附件中有 Git 的安装包)
下载地址:
安装步骤没有什么特殊的,基本默认然后点下一步就可以了,实在不放心可以看这个教程:
6.1.2 配置 Git 环境变量
依次进入开始菜单–>控制面板–>系统–>高级系统设置–>高级–>环境变量,在“系统变量”中找到“Path”并双击打开,点击“新建”,输入你的 Git 安装目录,比如我的是“C:\Program Files\Git”,回车,一直点击“确定”。
配置 Git 环境变量
6.1.3 配置 Git 的用户名和邮箱
打开 Git Bash,依次执行以下命令进行用户名和邮箱的配置(注意有无引号):
1 | |
配置 Git 的用户名和邮箱
配置完成后可以执行以下命令进行查看:
1 | |
查看 Git 配置的用户名和邮箱
如果你不嫌烦的话呢,也可以对 Git Bash 的界面进行美化设置,而且可以设置成中文,右击标题栏,选择“Options”,切换到“Window”,在“UI Language”里选择“zn_CH”,这里不再赘述。
设置 Git Bash 界面语言
6.1.4 修改执行策略权限
按快捷键 Win+X+A,以管理员身份运行“Windows PowerShell”,先查看执行策略权限状态,执行以下命令:
1 | |
查看执行策略权限状态
可以看到“CurrentUser”和“LocalMachine”的执行策略权限无法运行未签名的脚本。
① 修改 CurrentUser 的执行策略权限,执行以下命令:
1 | |
修改 CurrentUser 的执行策略权限
输入“A”,回车。
② 修改 LocalMachine 的执行策略权限,执行以下命令:
1 | |
修改 LocalMachine 的执行策略权限
输入“A”,回车。
再次查看执行策略权限状态,执行以下命令:
1 | |
查看执行策略权限状态
现在 PowerShell 可以运行未签名的脚本了。
6.1.5 安装 oh-my-posh
① 安装 posh-git,执行以下命令:
1 | |
安装 oh-my-posh
输入“Y”,回车。
安装 oh-my-posh
输入“A”,回车。
② 安装 oh-my-posh,执行以下命令:
1 | |

输入“A”,回车。
6.1.6 导入 oh-my-posh
依次执行以下命令:
1 | |

6.1.7 新建配置文件
(附件中有已经编辑好了的 Microsoft.PowerShell_profile.ps1 文件)
打开文件资源管理器,进入文件夹 C:\Users[你的用户名]\Documents\WindowsPowerShell,没有“WindowsPowerShell”文件夹就新建一个,然后在此文件夹内新建文本文档,编辑以下内容:
1 | |
另存为“Microsoft.PowerShell_profile.ps1”文件。
主题加载配置文件
6.1.8 美化配置
(附件中有已经配置好了的 settings.json 文件,直接覆盖源文件即可。背景图片和图标也在其内,配置时请注意文件所在路径)
打开文件资源管理器,进入文件夹 C:\Users[你的用户名]\AppData\Local\Packages\Microsoft.WindowsTerminal_8wekyb3d8bbwe\LocalState(预览版的配置文件所在目录 C:\Users[你的用户名]\AppData\Local\Packages\Microsoft.WindowsTerminalPreview_8wekyb3d8bbwe\LocalState),然后右击“settings.json”文件,“打开方式”选择“记事本”,以下摘选的是会影响外观的配置项(请根据自己需要进行增删改)。
1 | |
想预览其它主题,请访问:
想下载其它主题,请访问:主题下载(请不要直接覆盖 settings.json 文件,请编辑俩 .json 将内容复制到 settings.json 内的指定位置即可)
6.2 查看效果
附上效果图:

7. 附件下载
链接:https://dustinwinvip.lanzoui.com/b01oqqcej
密码:mhzd
编辑于 10-29